

Marble rye bread is a true game-changer when it comes to homemade baking. With its signature swirl of light and dark rye dough, this bread offers a unique twist on traditional rye. Not only does it look stunning, but it also packs a punch in flavor, combining the hearty richness of rye with a soft, tender crumb. Whether you’re a seasoned baker or just starting out, the process of creating marble rye is surprisingly simple—and the results are nothing short of satisfying.
Imagine slicing it into a loaf, revealing that beautiful marbled effect, and then enjoying it warm with a pat of butter or turning it into the perfect sandwich base. It’s versatile enough to complement soups, and grilled meats, or just to enjoy on its own. Ready to give it a try? Let’s dive into the recipe and discover how easy it is to make this flavorful, heart-healthy bread right in your own kitchen.
Key Benefits of Marble Rye Bread
Marble rye bread isn’t just a treat for your taste buds—it comes with a range of benefits that make it a perfect addition to any diet. Here’s why this hearty, flavorful bread is a must-try:
- Rich in Fiber: Rye flour is packed with dietary fiber, which is great for digestive health. Unlike white bread, marble rye helps promote regularity and keeps you feeling fuller for longer. This makes it a great option for those looking to increase their fiber consumption.
- Lower Glycemic Index: Marble rye bread has a lower glycemic index compared to other bread types, which means it won’t cause your blood sugar to spike as quickly. It’s a better choice for those managing blood sugar levels or looking for a more sustained energy boost throughout the day.
- Whole Grain Goodness: Rye is a whole grain, so you’re not just enjoying a delicious slice of bread—you’re fueling your body with essential nutrients like B vitamins, iron, and magnesium. These nutrients help support everything from your immune system to muscle function.
- A Healthier Alternative: While not gluten-free, marble rye is still a healthier option than traditional white bread. With its rich rye content, it offers a more robust flavor and texture, making each bite more satisfying. Plus, its complex flavor pairs beautifully with so many ingredients—think cheeses, meats, and even avocado spreads.
- Versatility: Beyond being an excellent base for sandwiches, marble rye bread can be toasted for breakfast or served as a side to hearty soups. Whether you’re looking for a healthier sandwich option or something to complement a main dish, marble rye bread never disappoints.
By choosing marble rye, you’re not just enjoying a tasty loaf—you’re adding a powerhouse of nutrients to your meals. Ready to make it yourself? Let’s move on to the ingredients you’ll need to create this delicious and nutritious bread.
Ingredients for Marble Rye Bread
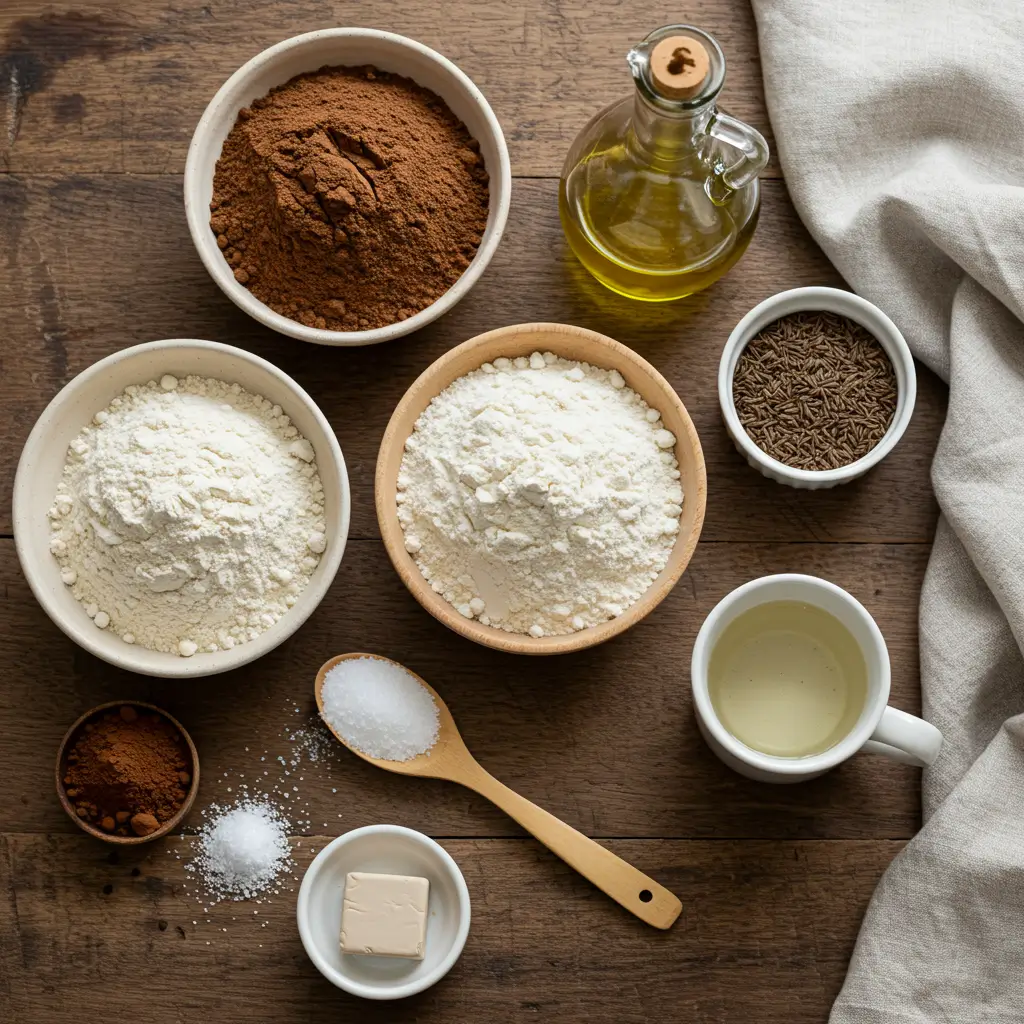
Now that you’re excited to make this delicious bread, let’s go over the ingredients you’ll need. Don’t worry—this recipe is straightforward, and the ingredients are easy to find at your local grocery store or bakery supply shop. Here’s what you’ll need to create your perfect marble rye bread:
- 2 cups of rye flour
This is the star ingredient! Rye flour gives the bread its signature texture and flavor. It’s a bit denser than wheat flour, which results in a hearty loaf. - 2 cups of all-purpose flour
Combining rye flour with all-purpose flour helps balance the bread’s structure, making it soft yet firm enough to hold its shape. - 1 tablespoon of sugar
Sugar isn’t just for sweetness—it helps activate the yeast and gives the bread a slight golden crust. - 1 packet of active dry yeast
Yeast is the key to making your bread rise. Be sure to use fresh yeast for the best results, as it ensures a light and fluffy texture. - 1 ½ teaspoons of salt
Salt is crucial for flavor balance. It enhances the earthy taste of the rye while also regulating yeast activity. - 1 tablespoon of olive oil
Olive oil adds moisture and richness to the dough, contributing to a tender crumb. - 1 cup of warm water
Water is essential to activate the yeast and help bring everything together. It should be warm—about 110°F (43°C)—but not hot, or it could kill the yeast. - 2 tablespoons of cocoa powder
For the marble effect! Cocoa powder adds a subtle richness and deep color to the dark portion of the dough. - 1 tablespoon of caraway seeds (optional)
If you love the distinctive, slightly tangy flavor that caraway seeds provide, feel free to add them in. They’re a classic addition to rye bread but can be omitted if you prefer a milder flavor.
With these ingredients on hand, you’ll be ready to craft a loaf of marble rye bread that’s bursting with flavor and texture. Make sure everything is measured accurately for the best results. Now, let’s move on to the next step—mixing and kneading the dough!
Instructions for Making Marble Rye Bread
Now comes the fun part—bringing everything together and watching your dough transform into a beautiful loaf of marble rye bread. Follow these steps, and you’ll have the perfect bread in no time. Let’s dive in!
Step 1: Mix the Dry Ingredients
In a large bowl, combine the rye flour, all-purpose flour, sugar, salt, and cocoa powder (for the darker marble section). Whisk them together to make sure they’re evenly mixed. This will give you a solid foundation for your dough.
Step 2: Activate the Yeast
In a separate bowl, combine the warm water with the active dry yeast. Stir it gently and let it sit for about 5-10 minutes until it becomes frothy. This means the yeast is activated and ready to do its magic. If the yeast doesn’t foam, it may be expired, so try again with a fresh packet.
Step 3: Make the Dough
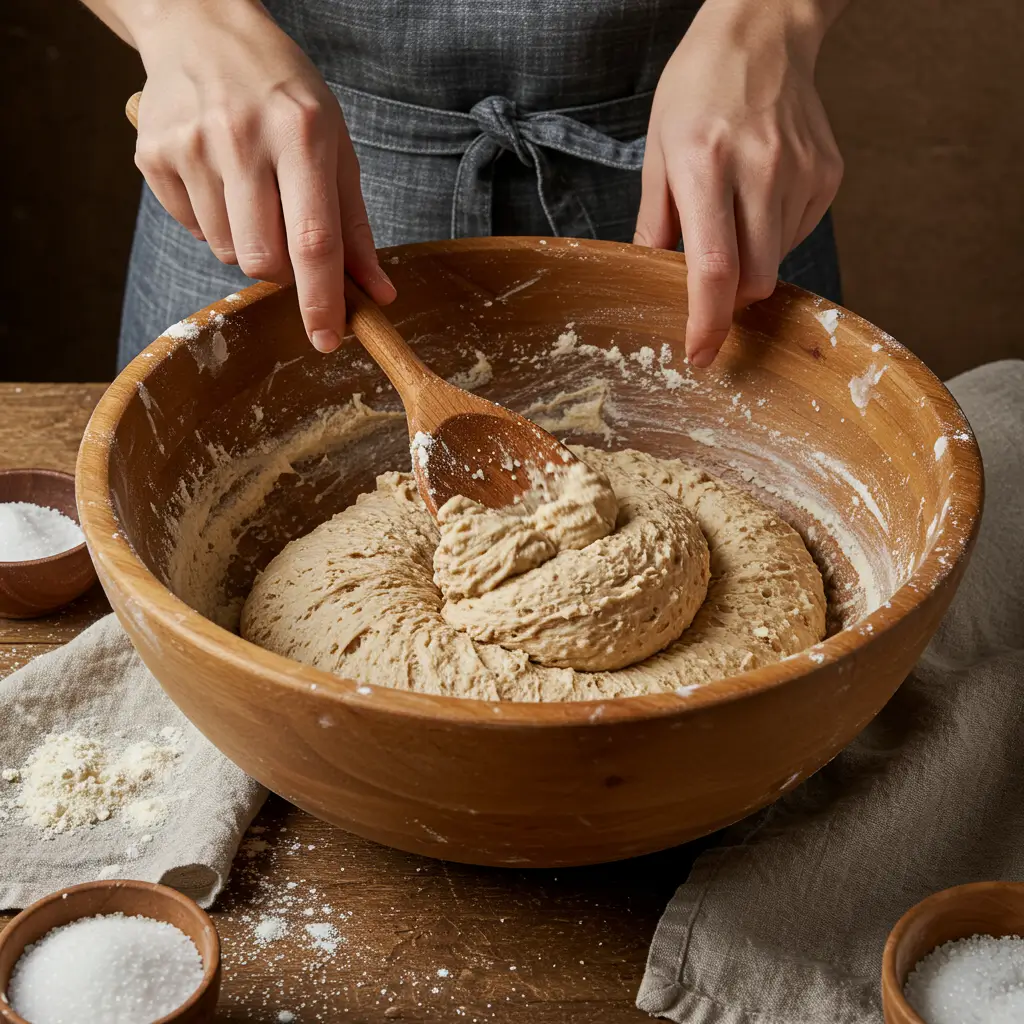
Once your yeast mixture is bubbly, pour it into the dry ingredients. Add the olive oil and mix everything together with a spoon or your hands. You’ll start to see the dough form, and at this point, you can switch to kneading. If the dough feels too sticky, add a little extra all-purpose flour—just be careful not to add too much, as you want it to stay soft and manageable.
Step 4: Knead the Dough
Turn your dough out onto a floured surface and knead it for about 8-10 minutes. The goal here is to develop the gluten, which gives the bread its structure. Don’t rush this process—kneading helps create a light, airy texture. Once the dough reaches a smooth and elastic consistency, form it into a round shape.
Step 5: Let It Rise
Transfer the dough to a bowl coated with a thin layer of oil, then cover it with a damp cloth. Allow the dough to rest in a warm spot for 1-2 hours, or until it has doubled in size. If you’re having trouble finding a warm spot, you can preheat your oven to 200°F (93°C) for a few minutes, turn it off, and place the bowl inside for the dough to rise.
Step 6: Divide the Dough
Once your dough has risen, gently press it down to expel any air pockets. Now, split the dough into two equal portions. Keep one portion as-is for the light rye dough, and mix cocoa powder into the second portion for the dark rye dough. Knead the cocoa powder into the dark dough until it’s evenly incorporated, creating a rich, chocolatey color.
Step 7: Shape the Loaf
Here’s where the magic happens! Take both portions of dough and roll each into a log, ensuring they’re roughly the same length. Stack the logs on top of each other, then gently twist them together to create that signature marble effect. Be careful not to overwork the dough—just enough to get a beautiful swirl.
Step 8: Second Rise
Place the twisted dough into a greased loaf pan, cover it with a cloth, and let it rise for another 45 minutes to 1 hour. This will allow the dough to puff up and take on its final shape.
Step 9: Bake
Preheat your oven to 375°F (190°C). Once the dough has risen, place it in the oven and bake for 30-35 minutes, or until the top is golden brown and the loaf sounds hollow when tapped on the bottom. You can also check the internal temperature with a kitchen thermometer—aim for about 190°F (88°C) inside the loaf.
Step 10: Cool and Serve
Let the marble rye bread cool on a wire rack for at least 30 minutes before slicing. This allows the flavors to set and ensures the loaf maintains its shape. Once cooled, slice and enjoy!
There you have it—a step-by-step guide to making your own marble rye bread from scratch. Remember, baking bread is all about patience and attention to detail, but with these instructions, you’ll be rewarded with a loaf that’s as delicious as it is beautiful. Enjoy the process, and soon enough, you’ll have a homemade loaf ready to share with friends and family!
Pro Tips and Variations
Baking marble rye bread is both an art and a science, and a few simple tweaks can elevate your loaf from good to bakery-quality. Whether you want to perfect the texture, enhance the flavor, or experiment with different styles, these expert tips and variations will help you achieve the best results.
Pro Tips for the Perfect Marble Rye Bread
✔ Use Fresh Yeast for the Best Rise
- Always check the expiration date on your yeast before starting. If your yeast doesn’t foam up during activation, it’s time for a new batch.
✔ Achieve the Ideal Dough Consistency
- If your dough is too sticky, add small amounts of flour (one tablespoon at a time) until it becomes smooth and workable. On the other hand, if it’s too dry, knead in a teaspoon of warm water to restore moisture.
✔ Master the Marble Effect
- To get a clean swirl, roll each portion of dough into a rectangle, then layer and twist gently. Avoid overmixing, or the pattern may blend too much, losing the striking marbled appearance.
✔ Enhance the Flavor with a Longer Proof
- For deeper flavor, refrigerate the dough overnight after the first rise. This slow fermentation develops more complex notes, making the bread even more delicious.
✔ Test for Doneness Like a Pro
- To check if your loaf is fully baked, tap the bottom. If it sounds hollow, it’s done! For extra precision, use a thermometer—the internal temperature should be around 190°F (88°C).
Creative Variations to Try
Classic Deli-Style Rye
- Add caraway seeds to the dough for a traditional rye bread taste with a mild, earthy spice.
Sourdough Marble Rye
- Swap the yeast for a sourdough starter and extend the fermentation time. This gives the bread a slightly tangy depth and a chewier texture.
Whole Wheat Twist
- Replace half of the all-purpose flour with whole wheat flour for a more wholesome, nutty flavor. You may need to add a little more water since whole wheat flour absorbs more moisture.
Gluten-Free Alternative
- Use a gluten-free flour blend in place of regular flour and add xanthan gum to help with elasticity. The texture will differ slightly, but it’s a great option for those avoiding gluten.
Sweet Marble Rye
- Want to turn this into a dessert-style bread? Mix a tablespoon of honey or molasses into the dough for a slightly sweet flavor that pairs beautifully with butter or jam.
With these tips and variations, you can easily customize your marble rye bread to suit your taste. Whether you prefer a traditional deli-style loaf or a creative twist, experimenting with different ingredients will make your baking experience even more enjoyable. Next, let’s explore the best ways to serve and enjoy your homemade bread!
Serving Suggestions
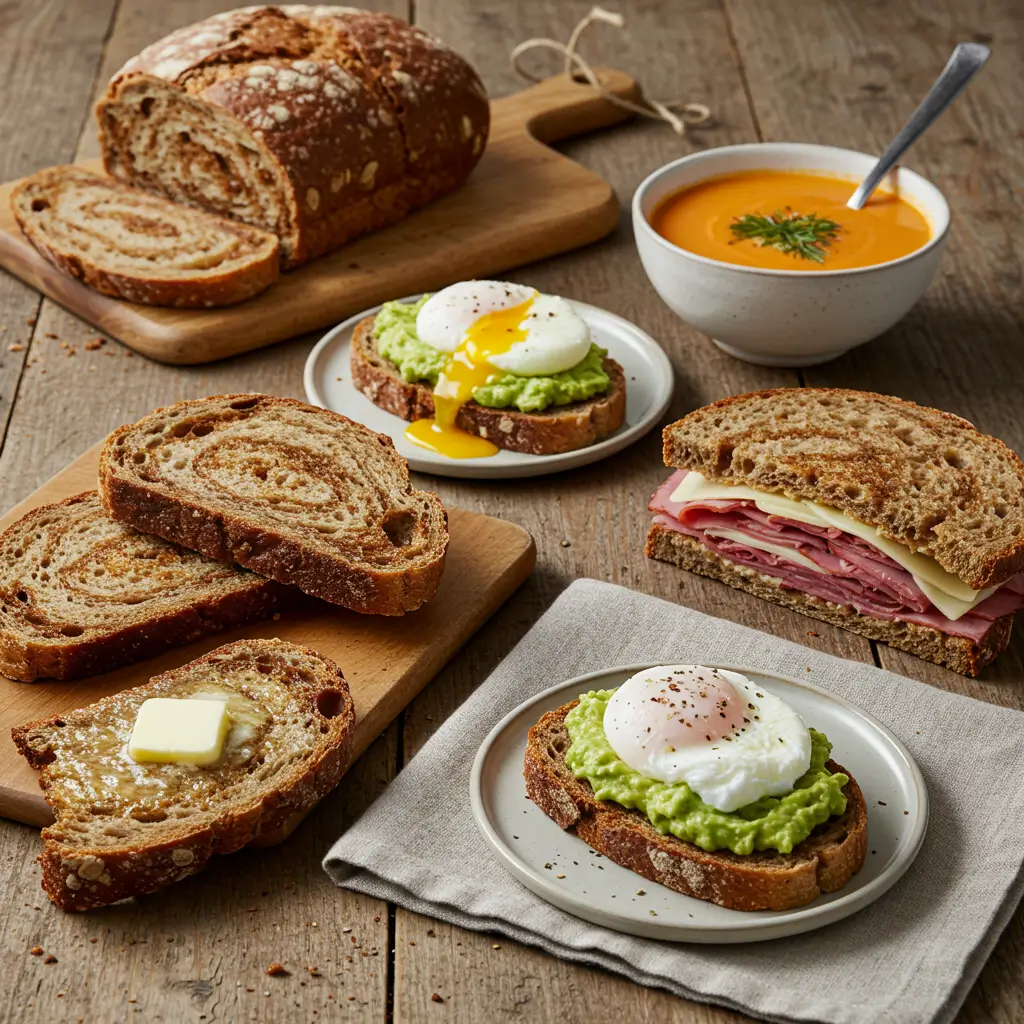
Marble rye bread isn’t just visually stunning—it’s incredibly versatile when it comes to serving. Whether you’re making a hearty sandwich, enjoying a warm slice with butter, or pairing it with your favorite meal, this bread adds a delightful depth of flavor to any dish. Here are some of the best ways to enjoy it:
1. Classic Deli-Style Sandwiches
Marble rye is a staple in delis for a reason—it makes the ultimate sandwich bread. Try it with:
- Pastrami or corned beef with mustard for a classic deli experience.
- Turkey and Swiss cheese, layered with lettuce and a tangy Russian dressing.
- Tuna or egg salad, adds a creamy contrast to the hearty bread.
2. Toasted Perfection
A simple slice of toasted marble rye is incredibly satisfying. Serve it with:
- Butter and jam for a sweet and savory contrast.
- Cream cheese and smoked salmon, topped with capers and red onion for a gourmet twist.
- Avocado and poached eggs, drizzled with olive oil and sprinkled with sea salt.
3. The Perfect Side for Soups and Stews
The rich flavor of rye pairs beautifully with comforting, hearty dishes. Serve it alongside:
- Tomato soup for a cozy and classic combination.
- Beef stew or goulash, using the bread to soak up the flavorful broth.
- Lentil soup, where the earthy rye complements the warm spices.
4. Grilled Cheese with a Twist
Upgrade your grilled cheese by swapping regular bread for marble rye. The slight tang of the rye balances beautifully with the richness of melted cheese. Try:
- Sharp cheddar and caramelized onions for a bold flavor.
- Mozzarella and sun-dried tomatoes for a Mediterranean touch.
- Gruyère and Dijon mustard for a sophisticated kick.
5. Breakfast with a Hearty Spin
Marble rye makes a fantastic base for breakfast dishes. Enjoy it with:
- French toast, dipped in a cinnamon-vanilla batter and cooked to golden perfection.
- Scrambled eggs and crispy bacon, served on lightly buttered toast.
- Peanut butter and banana slices, for a protein-packed start to your day.
6. Creative Crostini and Appetizers
Turn marble rye into an elegant appetizer by slicing it thin and toasting it into crostini. Top it with:
- Goat cheese and honey, sprinkled with crushed walnuts.
- Bruschetta mix, made with fresh tomatoes, basil, and balsamic glaze.
- Hummus and roasted red peppers, for a Mediterranean-inspired snack.
With so many ways to serve marble rye bread, you’ll never run out of delicious meal ideas. Whether you enjoy it fresh, toasted, or paired with your favorite dish, its unique flavor and texture make every bite unforgettable. Now that you know how to serve it, let’s wrap up with some final thoughts on why marble rye is truly a game-changer!
Conclusion
Marble rye bread is more than just a visually striking loaf—it’s a flavorful, versatile, and satisfying addition to any kitchen. With its perfect balance of light and dark rye, a slightly tangy depth, and a hearty texture, this bread can elevate everyday meals and special occasions alike. Whether you’re crafting a deli-style sandwich, toasting it for breakfast, or serving it alongside soups and stews, the possibilities are endless.
Baking this bread from scratch might seem like a challenge, but with patience and the right techniques, you’ll achieve a homemade loaf that’s both beautiful and delicious. From mixing and kneading to mastering the signature marble swirl, every step adds to the rewarding experience of baking. Plus, with the option to customize flavors, experiment with sourdough, or add creative toppings, you can truly make it your own.
So, why not give it a try? Once you taste the fresh, homemade goodness of marble rye bread, store-bought versions just won’t compare. Happy baking, and enjoy every slice of this game-changing bread!
If you loved making this marble rye bread, why not try another artisan loaf? Check out our Batard Bread recipe and bake like a pro at home!

Barble Rye Bread
Ingredients
- 2 cups of rye flour
- This is the star ingredient! Rye flour gives the bread its signature texture and flavor. It’s a bit denser than wheat flour which results in a hearty loaf.
- 2 cups of all-purpose flour
- Combining rye flour with all-purpose flour helps balance the bread’s structure making it soft yet firm enough to hold its shape.
- 1 tablespoon of sugar
- Sugar isn’t just for sweetness—it helps activate the yeast and gives the bread a slight golden crust.
- 1 packet of active dry yeast
- Yeast is the key to making your bread rise. Be sure to use fresh yeast for the best results as it ensures a light and fluffy texture.
- 1 ½ teaspoons of salt
- Salt is crucial for flavor balance. It enhances the earthy taste of the rye while also regulating yeast activity.
- 1 tablespoon of olive oil
- Olive oil adds moisture and richness to the dough contributing to a tender crumb.
- 1 cup of warm water
- Water is essential to activate the yeast and help bring everything together. It should be warm—about 110°F 43°C—but not hot, or it could kill the yeast.
- 2 tablespoons of cocoa powder
- For the marble effect! Cocoa powder adds a subtle richness and deep color to the dark portion of the dough.
- 1 tablespoon of caraway seeds optional
- If you love the distinctive slightly tangy flavor that caraway seeds provide, feel free to add them in. They’re a classic addition to rye bread but can be omitted if you prefer a milder flavor.
Instructions
Step 1: Mix the Dry Ingredients
- In a large bowl, combine the rye flour, all-purpose flour, sugar, salt, and cocoa powder (for the darker marble section). Whisk them together to make sure they’re evenly mixed. This will give you a solid foundation for your dough.
Step 2: Activate the Yeast
- In a separate bowl, combine the warm water with the active dry yeast. Stir it gently and let it sit for about 5-10 minutes until it becomes frothy. This means the yeast is activated and ready to do its magic. If the yeast doesn’t foam, it may be expired, so try again with a fresh packet.
Step 3: Make the Dough
- Once your yeast mixture is bubbly, pour it into the dry ingredients. Add the olive oil and mix everything together with a spoon or your hands. You’ll start to see the dough form, and at this point, you can switch to kneading. If the dough feels too sticky, add a little extra all-purpose flour—just be careful not to add too much, as you want it to stay soft and manageable.
Step 4: Knead the Dough
- Turn your dough out onto a floured surface and knead it for about 8-10 minutes. The goal here is to develop the gluten, which gives the bread its structure. Don’t rush this process—kneading helps create a light, airy texture. Once the dough reaches a smooth and elastic consistency, form it into a round shape.
Step 5: Let It Rise
- Transfer the dough to a bowl coated with a thin layer of oil, then cover it with a damp cloth. Allow the dough to rest in a warm spot for 1-2 hours, or until it has doubled in size. If you’re having trouble finding a warm spot, you can preheat your oven to 200°F (93°C) for a few minutes, turn it off, and place the bowl inside for the dough to rise.
Step 6: Divide the Dough
- Once your dough has risen, gently press it down to expel any air pockets. Now, split the dough into two equal portions. Keep one portion as-is for the light rye dough, and mix cocoa powder into the second portion for the dark rye dough. Knead the cocoa powder into the dark dough until it’s evenly incorporated, creating a rich, chocolatey color.
Step 7: Shape the Loaf
- Here’s where the magic happens! Take both portions of dough and roll each into a log, ensuring they’re roughly the same length. Stack the logs on top of each other, then gently twist them together to create that signature marble effect. Be careful not to overwork the dough—just enough to get a beautiful swirl.
Step 8: Second Rise
- Place the twisted dough into a greased loaf pan, cover it with a cloth, and let it rise for another 45 minutes to 1 hour. This will allow the dough to puff up and take on its final shape.
Step 9: Bake
- Preheat your oven to 375°F (190°C). Once the dough has risen, place it in the oven and bake for 30-35 minutes, or until the top is golden brown and the loaf sounds hollow when tapped on the bottom. You can also check the internal temperature with a kitchen thermometer—aim for about 190°F (88°C) inside the loaf.
Step 10: Cool and Serve
- Let the marble rye bread cool on a wire rack for at least 30 minutes before slicing. This allows the flavors to set and ensures the loaf maintains its shape. Once cooled, slice and enjoy!
Notes
- Calories: 180 kcal
- Carbohydrates: 34g
- Protein: 5g
- Fat: 2.5g
- Saturated Fat: 0.5g
- Cholesterol: 0mg
- Sodium: 230mg
- Fiber: 4g
- Sugar: 2g
FAQs
Do you have questions about making marble rye bread? Here are some common concerns and helpful answers to guide you through the process.
1. Why didn’t my dough rise properly?
There are a few possible reasons:
The yeast might be expired or inactive. Always proof your yeast in warm water (about 110°F/43°C) before adding it to the dough.
The dough may have been left in a cold environment. Try placing it in a warm spot or preheating your oven for a few minutes, turning it off, and letting the dough rise inside.
If the dough was too dry, it may not have developed enough elasticity. Add a little more water if needed.
2. Can I make marble rye bread without cocoa powder?
Yes! The cocoa powder is mainly for color, not flavor. If you’d like a natural alternative, try substituting dark rye flour or adding a small amount of coffee or molasses for a deeper shade.
3. How do I store marble rye bread to keep it fresh?
Keep it in an airtight bag or container at room temperature for up to 3-4 days.
For longer storage, freeze it in slices or as a whole loaf. Wrap it in plastic wrap and store it in a freezer bag for up to 3 months.1
4. Can I make this bread gluten-free?
Yes, but it requires adjustments. Use a gluten-free flour blend and add xanthan gum to help with structure. Keep in mind that the texture will be different from traditional rye bread.
5. How do I get a more pronounced marble swirl?
Make sure your light and dark dough portions are well-defined before twisting them together.
Roll out each portion into rectangles of equal size before layering and twisting.
Avoid overmixing when combining the two doughs, as this can blur the marble effect.
6. Can I use a bread machine for this recipe?
Yes! You can mix and knead the dough in a bread machine using the dough setting. Once kneaded, remove it, shape it manually, and bake it in the oven for the best results.
7. What can I do if my bread turns out too dense?
Ensure the dough has enough time to rise fully before baking.
Don’t add too much flour—stick to the recommended amounts and adjust only if necessary.
Knead the dough well to develop enough gluten, which helps create a light texture.
Where can I find another marble rye bread recipe?
For another take on marble rye bread, check out this detailed recipe from King Arthur Baking: King Arthur Baking – Marble Rye Recipe.
These tips should help you troubleshoot any issues and perfect your marble rye bread. Have fun experimenting, and enjoy every bite of your homemade loaf!
1 thought on “Marble Rye Bread: Why It’s the Ultimate Game-Changer”